The force net struts have now been properly attached. With regard to the rear canopy, I did use greenstuff to make it look plated, but thought it looked so bad that I removed it all and just replaced it with the single plate that you can see in the picture. I also added a Guardian sensor spine to the canopy, although it is perhaps unnecessary. The blades at the under front now look quite busy. The splinter rifle sits between the two other blades, while the small Reaver blades sit between the larger blades and the front canopy.

The picture taken from the front better shows the layout. It also better shows the work I did for the front of the model. I used a space marine shoulder pad (with detail filed off) to make a bit of a wind shield for the rider. I then used greenstuff to make the jet intake. As far as machines go, my greenstuff work is not to hot, so I was glad this was the only part that needed anything significant. I wanted the front of the craft to look a little like an Eldar head. The band of greenstuff looks a little like a visor or blindfold, while the grill looks a little like a screaming mouth. I actually wanted it to look a little like a Eldar Banshee mouthpiece, which is why I added the triangular bit at the bottom of the openning. I would imagine that while the Reaver can run almost silently when desired, it can also rapidly move emiting a screaming drone, so as to better terrorize their prey. If like the Talos, the jetbike is partly powered by a tortured soul, then the visage is not unappropriate. Greenstuff was also used to better attach the blades on the side of the front canopy. After all, I did not want them to look like they were only glued on. In general, I wanted all the blades to look like they are attached in a fragile manner. Although the blades are super sharp, I imagine that it is better for a blade to break off than for the bike to be really damaged. I like to imagine that a Reaver Rider who does not lose any of his blades while raiding would be sniggered about as being some kind of Craftworlder.
-------------------------------
This now completes all that I intended to do for the conversion. I must say that while it contains many attributes of my initial vision, it had diverged alot from what I initially intended. But that is part of what I like about converting, you never quite know how the jigsaw will turn out. Some parts are not as good as my mental vision, yet there are many aspects that are better than what I imagined. Also, my concepts about the model evolved as I was assembling it. Anyway, at least it can be seen what you can get by merging a Reaver Jet Bike sprue with a Guardian Heavy Weapon sprue.

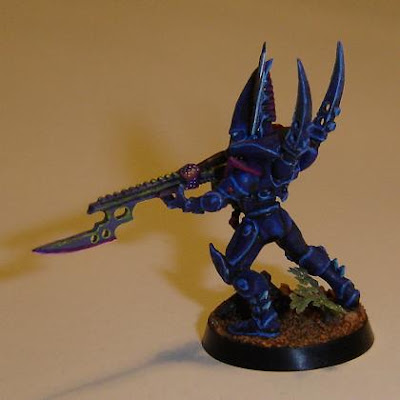
 While I had converted this warrior long long ago, he finally got a paint job. In fact, at this stage he is the only one of my Dark Eldar models that now is. Why did I paint him these colors. Well blue is the colour on the codex and sickly purple for the face plate and gun due to an image of a dark eldar that was published in White Dwarf. Not the best of reasons for color choice, but i thought I would try it and see. Unfortunately, with the release of codex Space Marines at this time, I was kind of regreting the blue due to all of the Ultra Marine images I was seeing. I also am not keen on the way I painted the face plate and gun, since it makes him look a little Nurglish, even though the Dark Eldar would deal in toxins. Sadly for this warrior, I think he is going to remain alone with this paint scheme. At this stage, I am not sure what scheme I should adopt for my force, so I will put it on the back boiler for awhile, as I have plenty of other things to work on. But to any who might read this, I would appreciate any comments or thoughts.